Back on the blog after a long hiatus - this time, I’m shifting gears from just reviewing papers(which are available on my GitHub) to diving deep into hands-on implementations.
I’ve always been interested in systems programming, but somehow never really picked it up. The rate of progress in the GenAI space has been exponential recently, with players like Google [1] reportedly processing 9.7 trillion tokens a month. Companies are now investing more time and resources in making these Large Language Models as fast and cheap as possible, by improving training and inference efficiency using “moar” compute.
I briefly spoke about GPU computing last year, and finally decided to learn it this summer. The goal is to eventually be able to implement kernels for fast matmuls, softmax, and FlashAttention.
Why Mojo?
I’ve tried learning Rust multiple times, along with a few stints of trying C, C++ and Zig, but I never really felt as comfortable in these languages as I do in Python and Elixir.
In early 2023, Modular announced Mojo🔥, a new systems-programming language promising:
- Python-like syntax
- Support for both CPU and GPU architectures
- Kernel autofusion
- Builds on MLIR
- Traits and bounds checking
- Interopeability with PTX, Python, C
Modular has since announced Max, their AI inference platform, built on Mojo. The released all kernels available as part of the platform, along with their own version[2] of Sasha Rush’s GPU Puzzles [3] in Mojo. IMO, their kernels were much easier to read compared to CUDA/Triton implementations. I also enjoyed the “Democratising AI Compute”[4] series by Chris Lattner, and thus I decided to learn a bit more about how to write these kernels in Mojo.
GPU 101
GPUs (Graphics Processing Units) are massively parallel processors optimized for throughput over latency. In GPU programming we:
- Lay out data and computation as a grid of thread blocks.
- Launch a kernel from the CPU (host) to run on the GPU (device).
- Exploit thousands of lightweight threads all executing the same code (Single Instruction, Multiple Threads or SIMT).
Modern chips had two ways to spend their billions of transistors:
- CPUs invest them in large caches, branch predictors and out-of-order logic to minimize latency for one or a few threads.
- GPUs invest them in thousands of simple cores and huge register files to maximize throughput for many threads, assuming those threads can tolerate latency by waiting in parallel.
The rest of this section unpacks how that single design choice shows up in memory, execution and program flow.
1. Memory hierarchy – hide latency with tons of threads
CPUs invest transistors in large caches to minimize latency. GPUs take the opposite approach: they use thousands of threads to hide latency instead of avoiding it.
GPU memory hierarchy (slowest/largest to fastest/smallest):
- Global (HBM): High Bandwidth Memory—the GPU’s main memory, large but high-latency, visible to all threads
- Shared (SRAM): fast on-chip memory, ~100x faster than HBM
- Registers: per-thread storage, fastest access, ~1000x faster than HBM
![Source: FlashAttention [5]. Metrics shown are for an NVIDIA A100 GPU.](mojo_gpu_puzzles/memory_hierachy_fa.png)
The key insight: when threads wait for slow global memory (~400-800 cycles), the GPU immediately switches to other threads. This keeps compute units busy while data moves through the hierarchy.
2. Execution hierarchy – launch enough warps to hide stalls
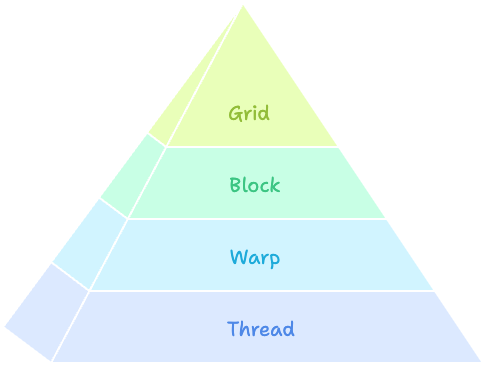
Building from the bottom up:
- Thread: the basic execution unit with its own registers
- Warp: 32 threads executing the same instruction together (the basic unit of GPU scheduling)
- Block: a group of threads that share
sharedmemory and can synchronize
- Grid: a collection of blocks distributed across SMs
GPUs schedule threads in groups of 32 (warps). When one warp stalls on memory, the scheduler switches to another warp instantly. More resident warps = better latency hiding.
3. Program flow – CPU launches, GPU streams
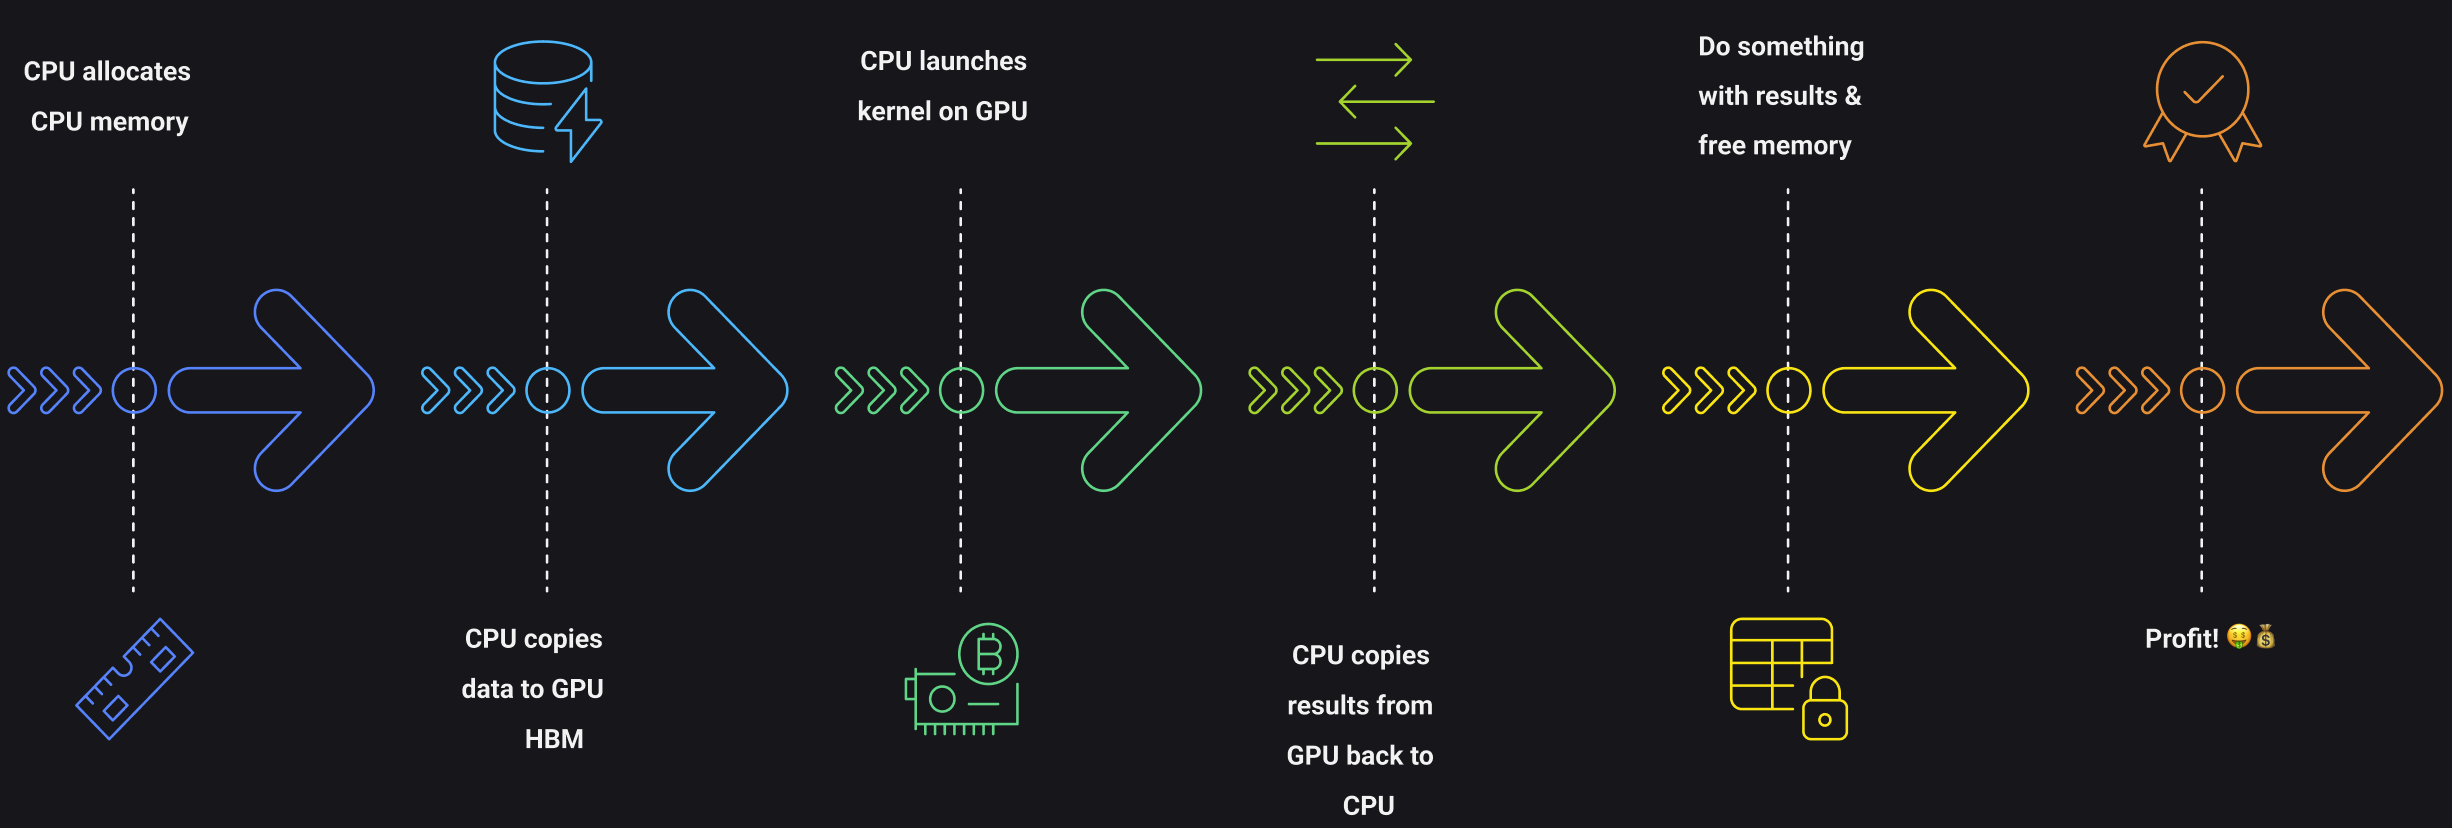
The CPU launches kernels asynchronously and goes back to other work. Inside the GPU each warp executes the same instruction (SIMT). Divergent branches disable some lanes and waste those cores.
- Host allocates and copies data to GPU global memory
- Host launches the kernel with a specified grid and block size
- Device executes the kernel in parallel across threads
- Host retrieves results from GPU memory
Putting it together
Fast GPU kernels keep cores busy by:
- Staging hot data in
sharedor registers - Launching enough threads to mask global-memory latency
- Writing branch-free, data-parallel code
We will cover the practical implications of the above topics as we go through the puzzles.
Infrastructure
If you plan on solving these puzzles, remember to pick a compatible GPU and follow the setup instructions
I completed the puzzles on a instance with a RTX4090 Ti chip, rented via Prime Intellect at 0.22 $/hr!
Note: The Modular team has created beautiful Manim visualizations for each puzzle, making the concepts much more intuitive. I’ll walk through these visualizations as we tackle each problem.
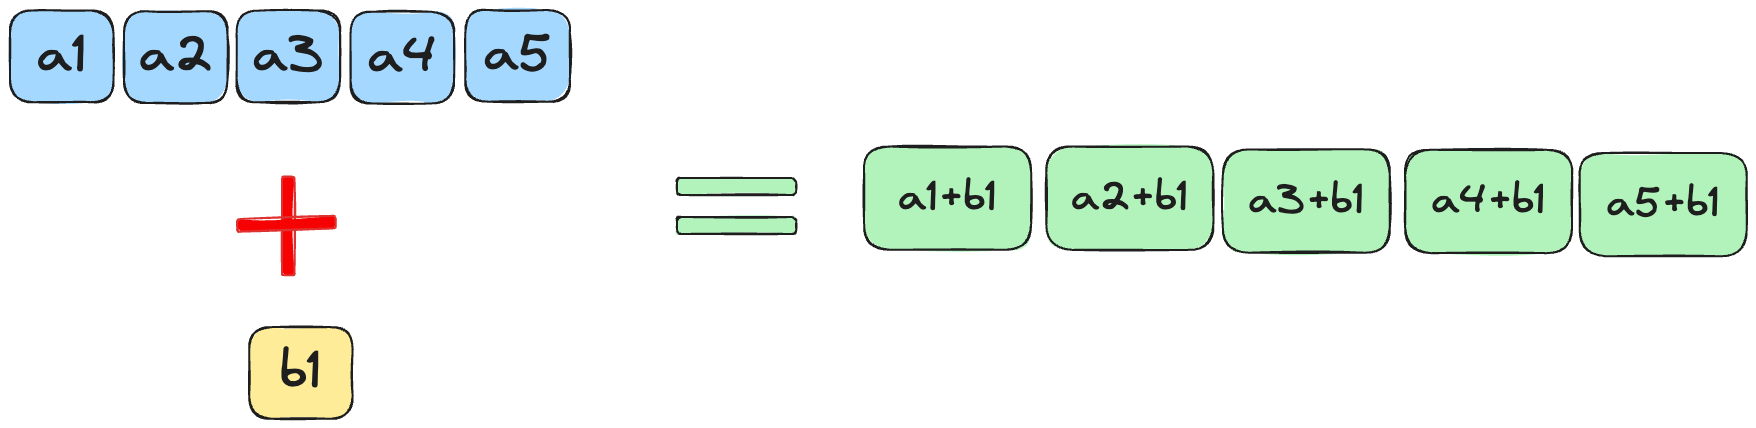
Puzzle 1: Map
In this puzzle, we aim to add a scalar to a vector. Specifically, we want to use a separate thread for each element in the vector, add the scalar, and write the result to the output memory.
When we create the kernel, the scalar will be effectively “broadcast” or expanded to match the shape of the input vector. This allows each element of the vector to be independently added with the scalar value in parallel by its dedicated thread, following the broadcasting rules.
Solution
p01.mojo
fn add_10(out: UnsafePointer[Scalar[dtype]], a: UnsafePointer[Scalar[dtype]]):
    i = thread_idx.x
    out[i] = a[i] + 10
pixi run p01
# out: HostBuffer([10.0, 11.0, 12.0, 13.0])
# expected: HostBuffer([10.0, 11.0, 12.0, 13.0])Puzzle 2: Zip
This is an extension of the map puzzle. Now, we aim to add 2 tensors together.
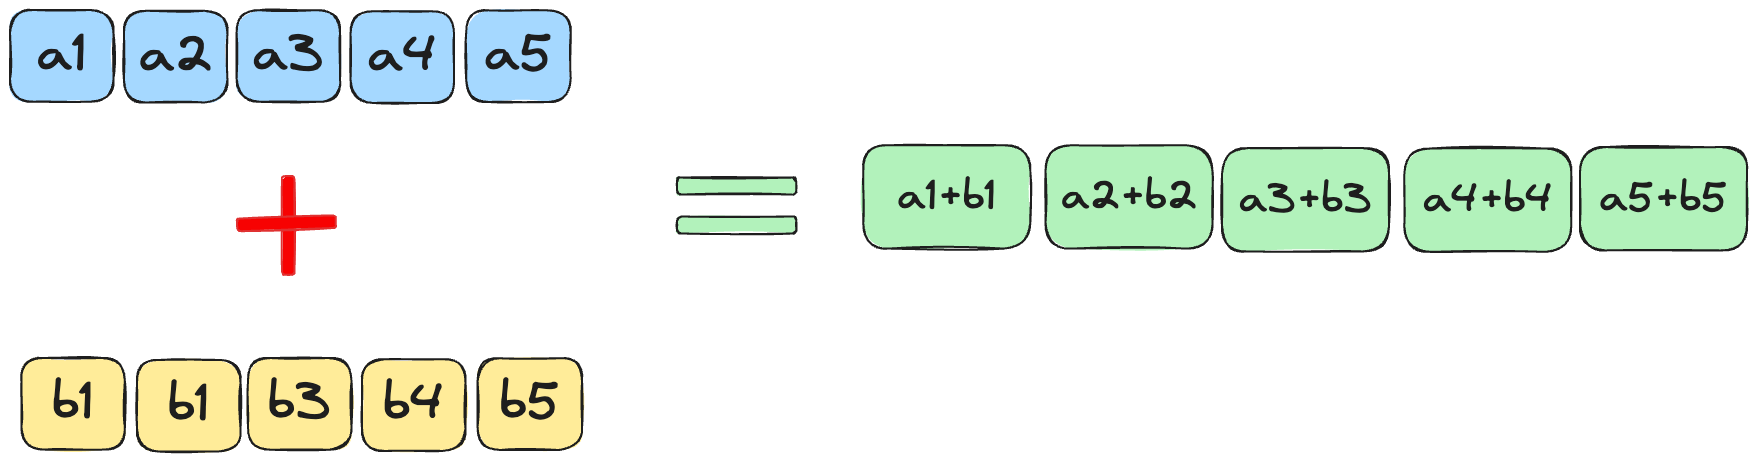
As in puzzle 1, the aim is to use one individual thread for elements at a specific index in both vectors.
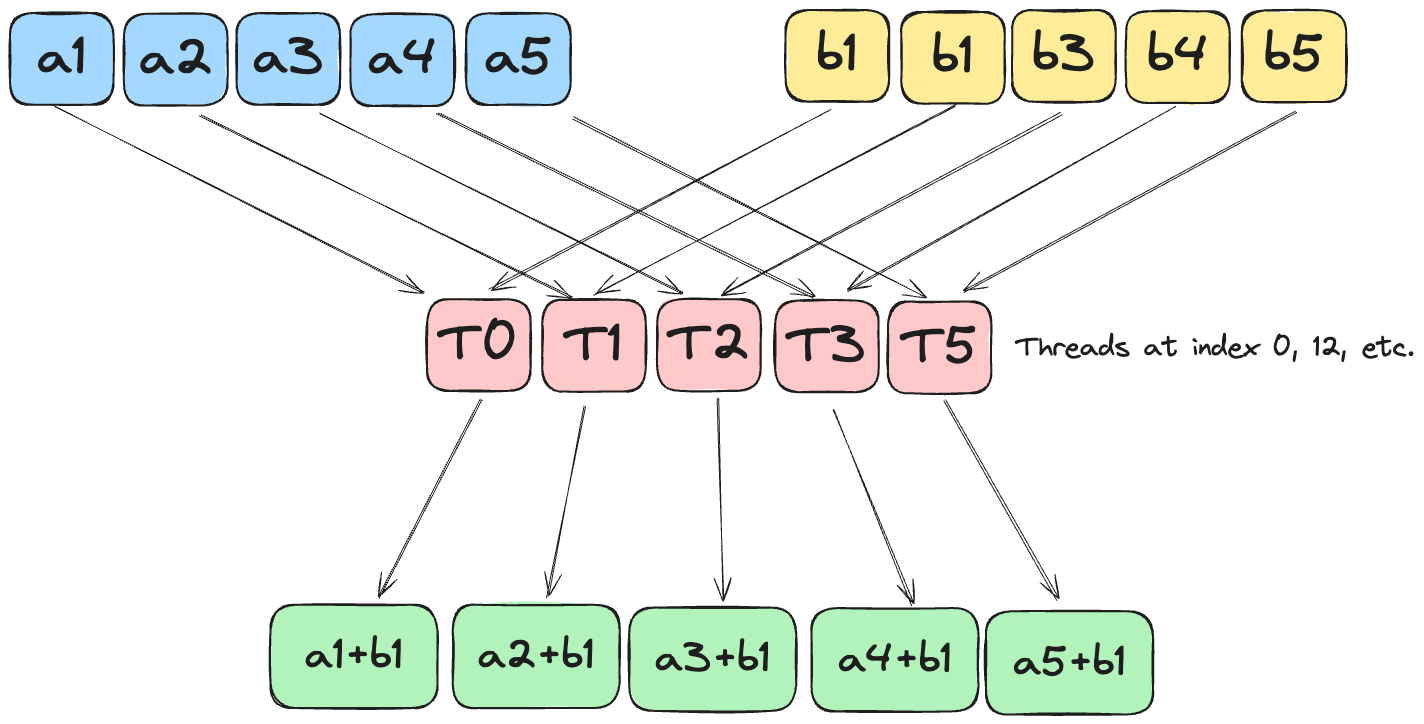
Note that we assume the entire array will fit within a single block, which is why there is no code for boundary checking, edge cases, etc.
Solution
p02.mojo
fn add(
    out: UnsafePointer[Scalar[dtype]],
    a: UnsafePointer[Scalar[dtype]],
    b: UnsafePointer[Scalar[dtype]],
):
    i = thread_idx.x
    out[i] = a[i] + b[i]
pixi run p02
# a: HostBuffer([0.0, 1.0, 2.0, 3.0])
# b: HostBuffer([0.0, 1.0, 2.0, 3.0])
# out: HostBuffer([0.0, 2.0, 4.0, 6.0])
# expected: HostBuffer([0.0, 2.0, 4.0, 6.0])Puzzle 3: Guards
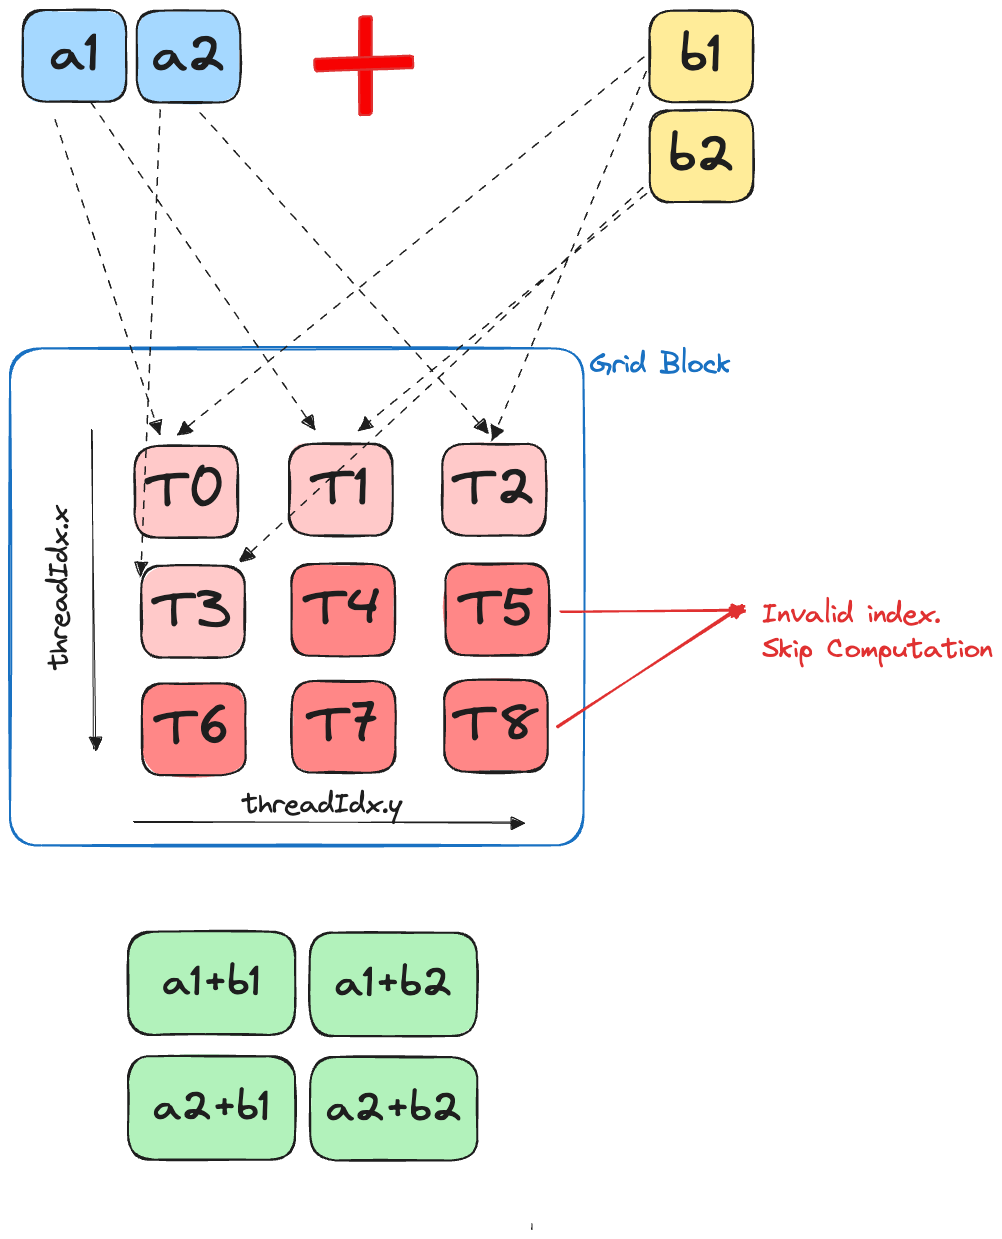
The only difference between this puzzle and Puzzle 1 is that now it’s possible that the size of the GPU block is larger than the given input.
In GPU programming, “guards” refer to conditional statements that check if a thread should perform work based on its index. GPUs launch threads in fixed-size groups (blocks), and often these blocks contain more threads than elements in our array.
In this case, we need to check if the current thread index is valid before applying our computation on the vector. Without this guard, threads with indices beyond our array bounds would cause memory access violations.
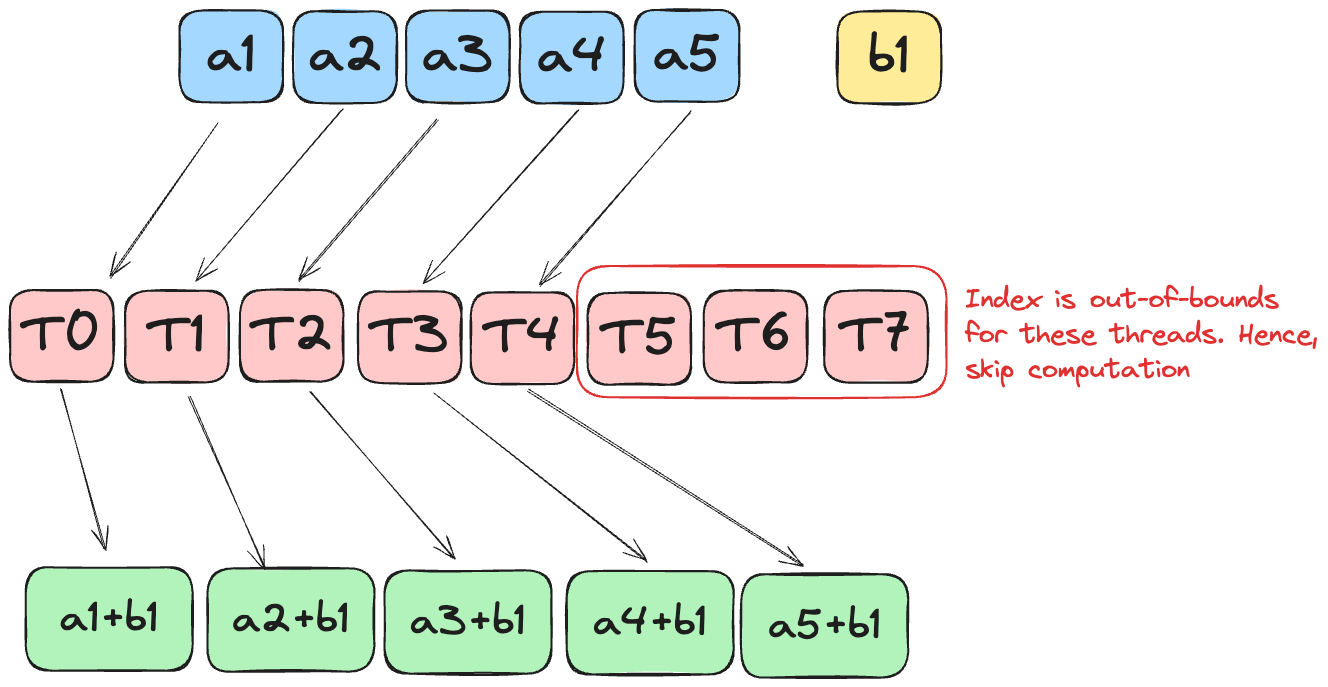
The image above illustrates how some threads have indices that exceed the array size and must be prevented from accessing memory.
Solution
p03.mojo
fn add_10_guard(
    out: UnsafePointer[Scalar[dtype]],
    a: UnsafePointer[Scalar[dtype]],
    size: Int,
):
    i = thread_idx.x
    if i < size:
        out[i] = a[i] + 10
Note that the size of the array is also sent as input to the kernel, as computing it in the kernel would defeat the purpose of parallelisation. While these conditional checks are necessary for correctness, they can introduce some performance overhead due to thread divergence within warps. We’ll cover this in more detail shortly.
pixi run p03
# in: HostBuffer([0.0, 1.0, 2.0, 3.0])
# out: HostBuffer([10.0, 11.0, 12.0, 13.0])
# expected: HostBuffer([10.0, 11.0, 12.0, 13.0])
Puzzle 4: 2D Map
Similar to Puzzle 2, instead of operating on scalars with 1D tensors, we will now use 2D tensors.
Mojo, similar to CUDA, typically uses row-major order for array storage, meaning data is stored sequentially by rows in memory.
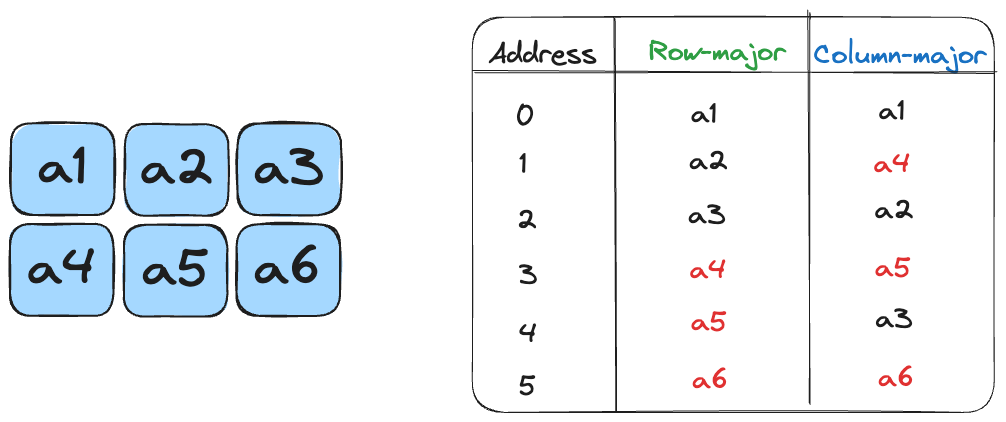
Given the row-major format, the elements are accessed using the formula:
\[ A_{R,C} = R*\text{size\_of\_array} + C \]
Raw Memory Approach
Solution
p04.mojo
fn add_10_2d(
    out: UnsafePointer[Scalar[dtype]],
    a: UnsafePointer[Scalar[dtype]],
    size: Int,
):
    row = thread_idx.y
    col = thread_idx.x
    if row < size and col < size:
        out[row * size + col] = a[row*size+col] + 10
pixi run p04
# in: HostBuffer([0.0, 1.0, 2.0, 3.0]) -- shaped as 2x2 row-major
# out: HostBuffer([10.0, 11.0, 12.0, 13.0])
# expected: HostBuffer([10.0, 11.0, 12.0, 13.0])LayoutTensor
LayoutTensor[6] is Mojo’s abstraction to work on a Tensor.
Specifically, LayoutTensor aims to provide:
- High level primitive to perform operations on tiles.
- Flexible memory layouts, with support for row-based, column-based and tiled organisation of data in memory.
- Expose functions/parameters to enable auto-tuning or manual experimentation.
- Access to hardware without inline assembly.
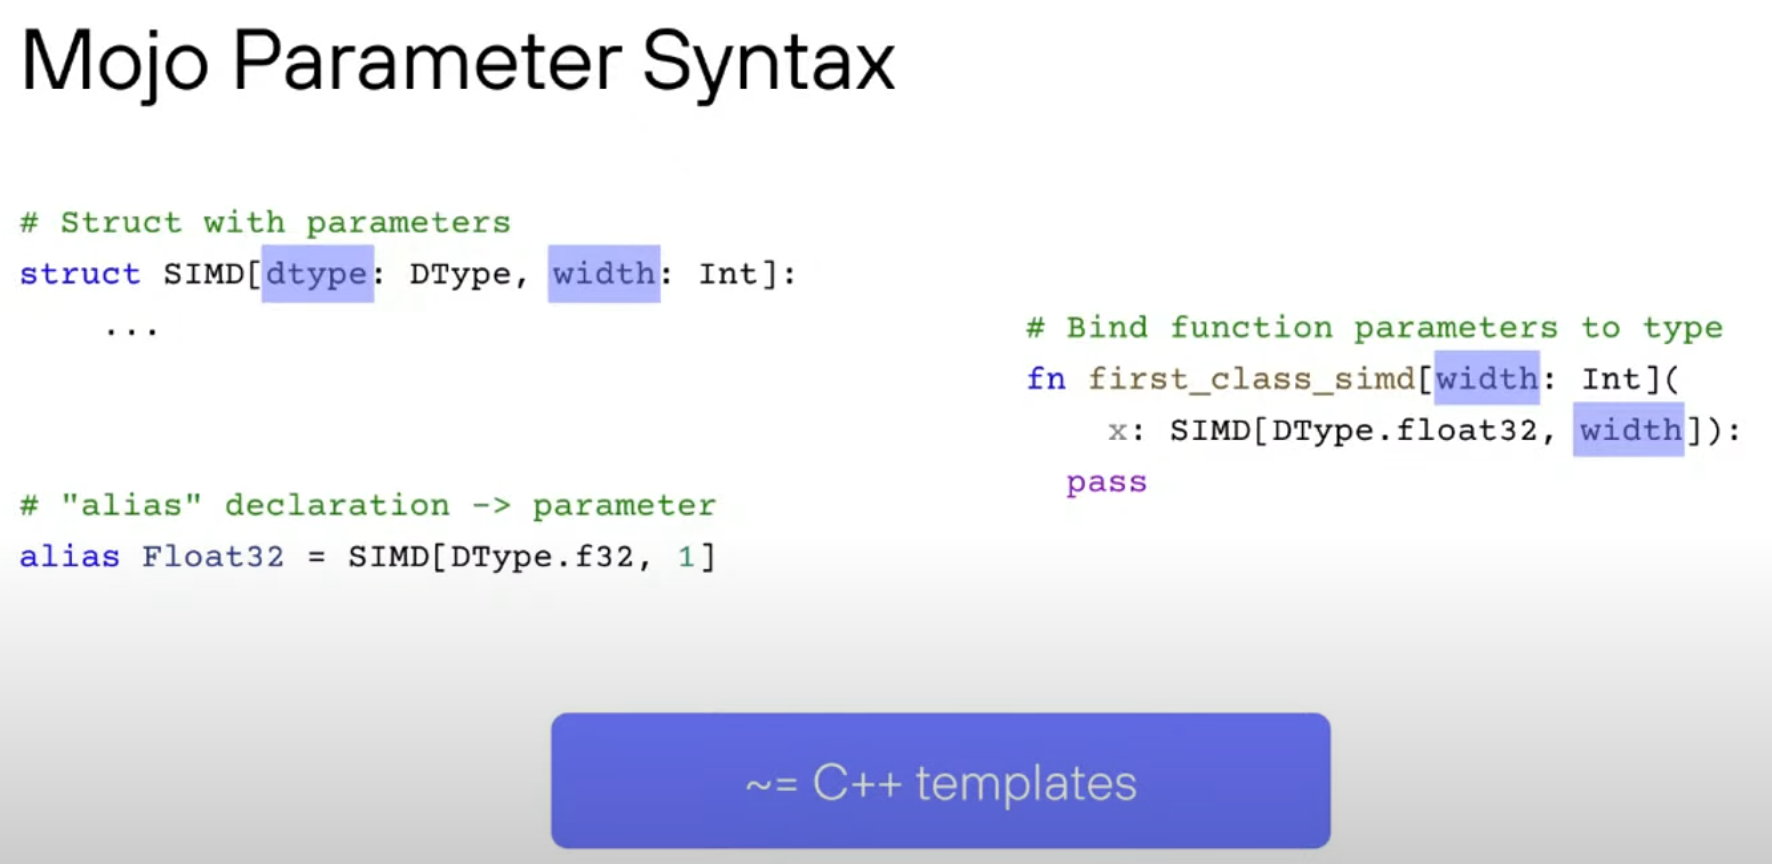
Mojo(and LayoutTensor) follow this “parameter syntax”[7], which is similar to how C++ templates are defined. This was a bit difficult for me to grasp since I don’t have a C++ background, and caused a few troubles in the upcoming puzzles. I was happy to learn that I’m not the only one struggling with it though![8] .
The features that looked most interesting to me are:
- Natural Indexing: Index a element using the format
A[row, col] - Automatic Bounds Checking: I’ve (ab)used this feature in the upcoming puzzles.
Some examples of LayoutTensor in practice:
layout_tensor.mojo
from layout import Layout, LayoutTensor

# Define layout
alias HEIGHT = 2
alias WIDTH = 3
alias layout = Layout.row_major(HEIGHT, WIDTH)

# Create tensor
tensor = LayoutTensor[dtype, layout](buffer.unsafe_ptr())

# Access elements naturally
tensor[0, 0] = 1.0  # First element
tensor[1, 2] = 2.0  # Last element

# Column-major layout
layout_col = Layout.col_major(HEIGHT, WIDTH)

# Tiled layout (for better cache utilization)
layout_tiled = tensor.tiled[4, 4](HEIGHT, WIDTH)
Solution
p04.mojo
fn add_10_2d(
    out: LayoutTensor[mut=True, dtype, layout],
    a: LayoutTensor[mut=True, dtype, layout],
    size: Int,
):
    row = thread_idx.y
    col = thread_idx.x
    # NOTE: With layout tensor, this is not really necessary, but it helps prevent unwanted memory access
    if row < size and col < size:
        out[row, col] = a[row, col] + 10.0
pixi run p04_layout_tensor
# in: HostBuffer([0.0, 1.0, 2.0, 3.0])
# out shape: 2 x 2
# out: HostBuffer([10.0, 11.0, 12.0, 13.0])
# expected: HostBuffer([10.0, 11.0, 12.0, 13.0])Puzzle 5: Broadcast
We aim to broadcast the addition operation over two vectors. Following the broadcasting rules, the result will be an outer-product of the given vectors.
Raw Memory Version
Solution
p05.mojo
fn broadcast_add(
    out: UnsafePointer[Scalar[dtype]],
    a: UnsafePointer[Scalar[dtype]],
    b: UnsafePointer[Scalar[dtype]],
    size: Int,
):
    row = thread_idx.y
    col = thread_idx.x
    if row < size and col < size:
        out[row*size + col] = a[row] + b[col]
pixi run p05
# in a: HostBuffer([0.0, 1.0])
# in b: HostBuffer([0.0, 1.0])
# out: HostBuffer([0.0, 1.0, 1.0, 2.0])
# expected: HostBuffer([0.0, 1.0, 1.0, 2.0])Layout Tensor
Since we know the inputs are 1D vectors, we use only one dimension from each of the vectors, and set the other to 0 i.e the first element.
Solution
p05_layout_tensor.mojo
fn broadcast_add[
    out_layout: Layout,
    a_layout: Layout,
    b_layout: Layout,
](
    out: LayoutTensor[mut=True, dtype, out_layout],
    a: LayoutTensor[mut=False, dtype, a_layout],
    b: LayoutTensor[mut=False, dtype, b_layout],
    size: Int,
):
    row = thread_idx.y
    col = thread_idx.x
    if row < size and col < size:
        out[row, col] = a[0, row] + b[col, 0]
pixi run p05_layout_tensor
# in a: HostBuffer([0.0, 1.0])
# in b: HostBuffer([0.0, 1.0])
# out shape: 2 x 2
# out: HostBuffer([0.0, 1.0, 1.0, 2.0])
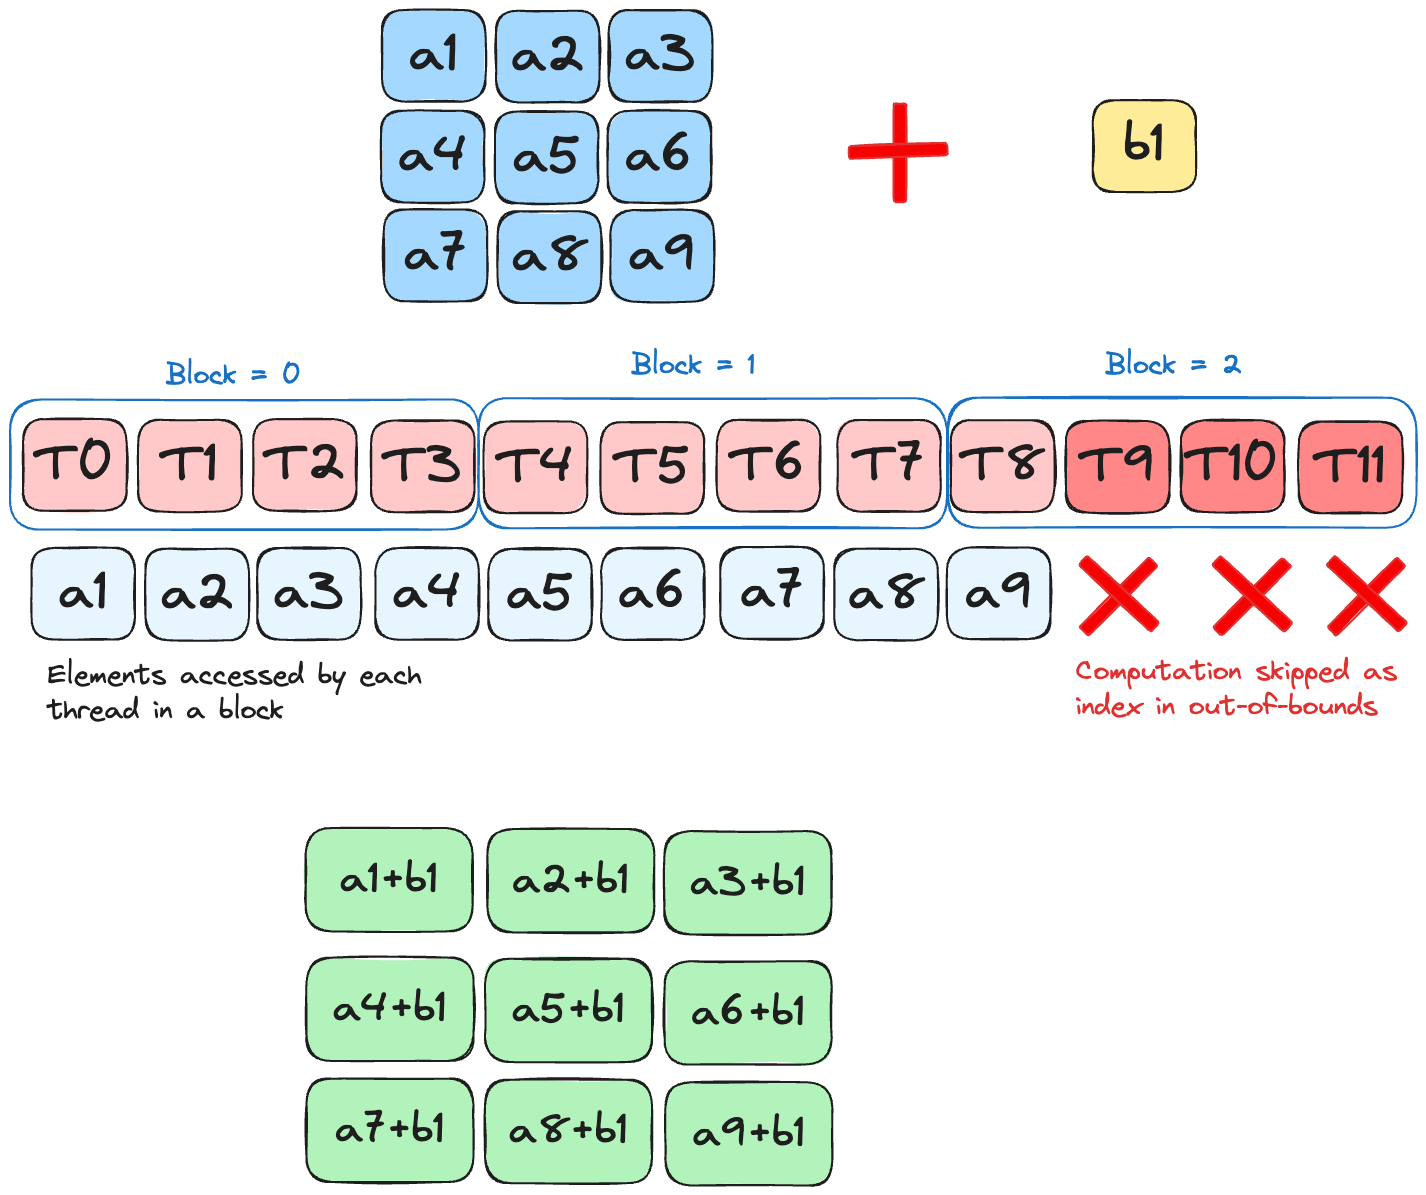
# expected: HostBuffer([0.0, 1.0, 1.0, 2.0])Puzzle 6: Blocks
Building on Puzzles 4 and 5, we now aim to add a scalar to a tensor. We also have the additional restriction around having fewer threads than the elements in our array, per block. This means that now apart from using the local indices of the current thread(thread_idx.y and thread_idx.x), we now also need to identify the current block, using block_idx.y and block_idx.x. The formula for calculating the index, in row-major format, is:
\[ idx = block\_idx.x * block\_dim.x + thread\_idx.x \]
Solution
p06.mojo
alias SIZE = 9
alias BLOCKS_PER_GRID = (3, 1)
alias THREADS_PER_BLOCK = (4, 1)
alias dtype = DType.float32


fn add_10_blocks(
    out: UnsafePointer[Scalar[dtype]],
    a: UnsafePointer[Scalar[dtype]],
    size: Int,
):
    i = block_dim.x * block_idx.x + thread_idx.x
    if i < size:
        out[i] = a[i] + 10
Puzzle 7: 2D Blocks
As the title suggests, we now have a 2D structure for both blocks and grids, and the number of threads per block is lesser than the total number of elements in the input tensor.
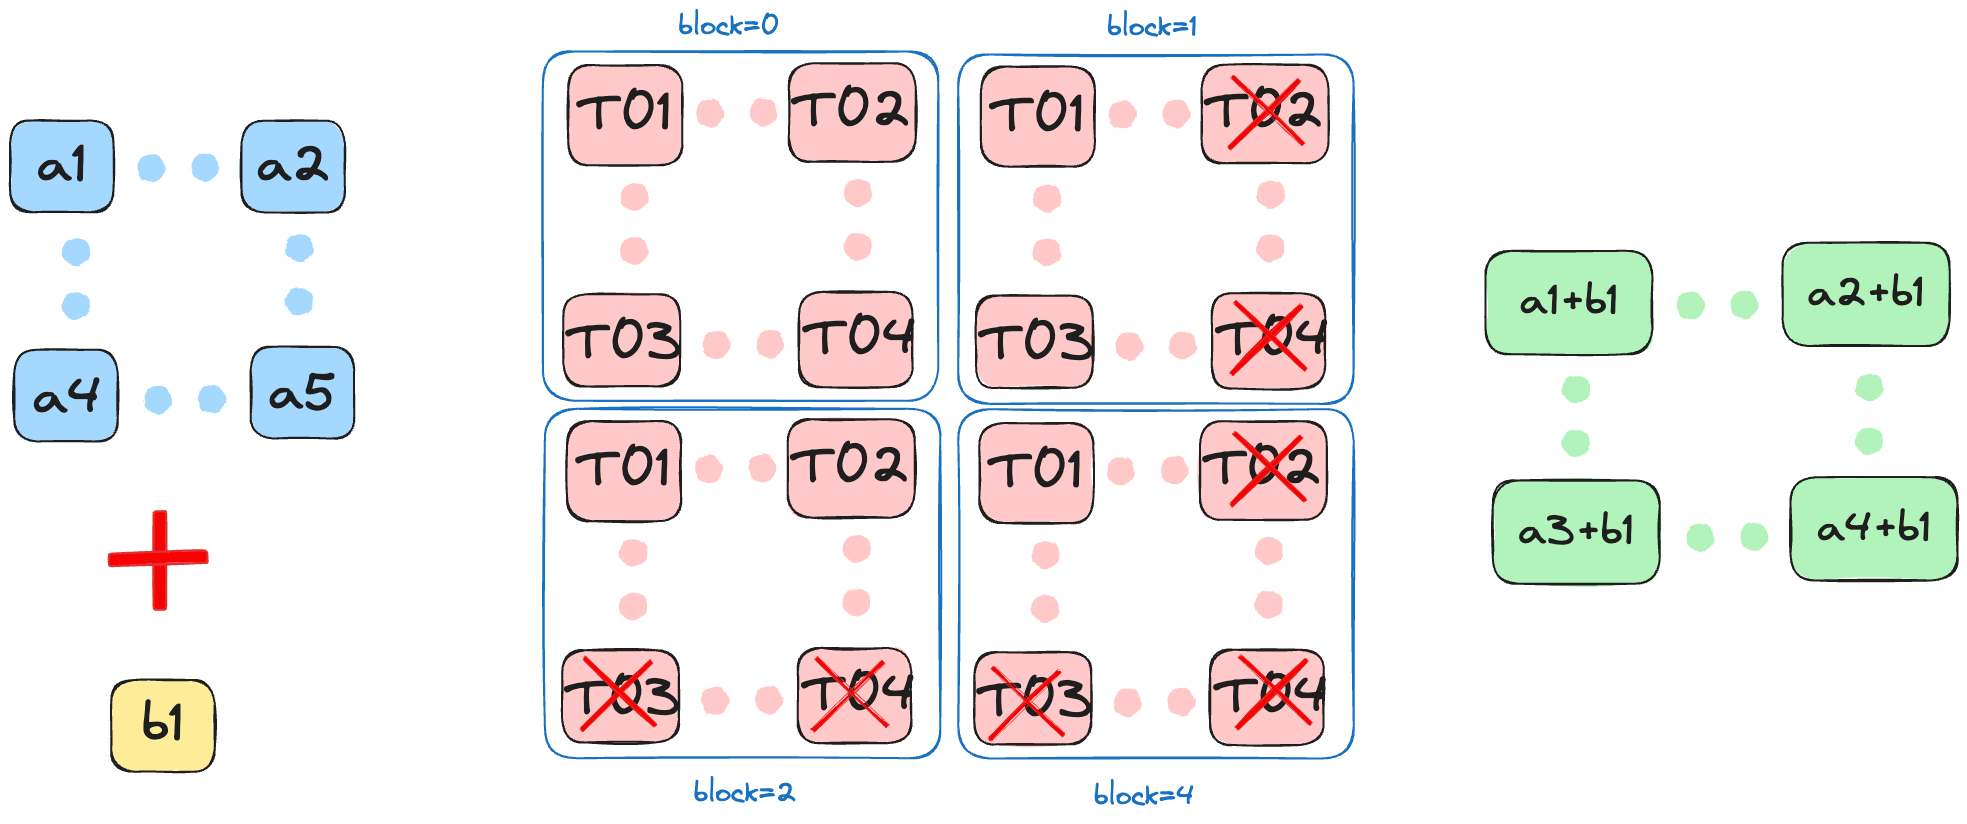
Raw Memory
Solution
p07.mojo
alias SIZE = 5
alias BLOCKS_PER_GRID = (2, 2)
alias THREADS_PER_BLOCK = (3, 3)
alias dtype = DType.float32


fn add_10_blocks_2d(
    out: UnsafePointer[Scalar[dtype]],
    a: UnsafePointer[Scalar[dtype]],
    size: Int,
):
    row = block_dim.y * block_idx.y + thread_idx.y
    col = block_dim.x * block_idx.x + thread_idx.x
    if row < size and col < size:
        out[row * size + col] = a[row * size + col] + 10.0

```bash
pixi run p07
# out: HostBuffer([11.0, 11.0, 11.0, 11.0, 11.0, 11.0, 11.0, 11.0, 11.0, 11.0, 11.0, 11.0, 11.0, 11.0, 11.0, 11.0, 11.0, 11.0, 11.0, 11.0, 11.0, 11.0, 11.0, 11.0, 11.0])
# expected: HostBuffer([11.0, 11.0, 11.0, 11.0, 11.0, 11.0, 11.0, 11.0, 11.0, 11.0, 11.0, 11.0, 11.0, 11.0, 11.0, 11.0, 11.0, 11.0, 11.0, 11.0, 11.0, 11.0, 11.0, 11.0, 11.0])
Layout Tensor
Solution
p07.mojo
alias SIZE = 9
alias BLOCKS_PER_GRID = (3, 1)
alias THREADS_PER_BLOCK = (4, 1)
alias dtype = DType.float32


fn add_10_blocks(
    out: UnsafePointer[Scalar[dtype]],
    a: UnsafePointer[Scalar[dtype]],
    size: Int,
):
    i = block_dim.x * block_idx.x + thread_idx.x
    if i < size:
        out[i] = a[i] + 10
pixi run p07_layout_tensor
# out: 11.0 11.0 11.0 11.0 11.0
# 11.0 11.0 11.0 11.0 11.0
# 11.0 11.0 11.0 11.0 11.0
# 11.0 11.0 11.0 11.0 11.0
# 11.0 11.0 11.0 11.0 11.0
# expected: 11.0 11.0 11.0 11.0 11.0
# 11.0 11.0 11.0 11.0 11.0
# 11.0 11.0 11.0 11.0 11.0
# 11.0 11.0 11.0 11.0 11.0
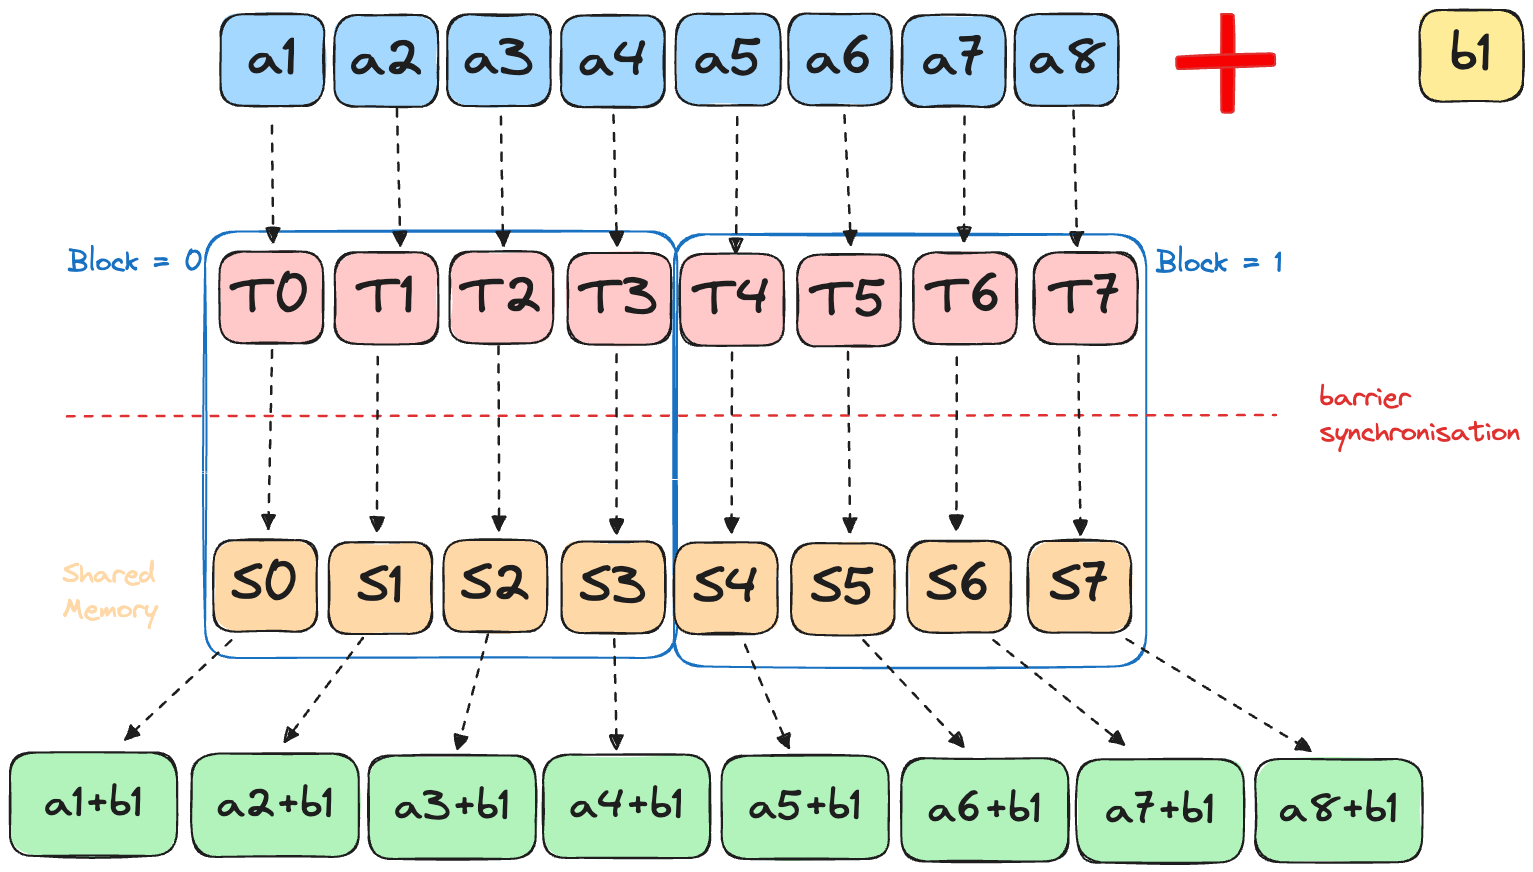
# 11.0 11.0 11.0 11.0 11.0Puzzle 8: Shared Memory
This puzzle introduces shared memory—the on-chip SRAM that makes GPUs fast. Instead of each thread reading from slow global memory, we’ll load data into shared memory once and let all threads in a block access it quickly.
In this puzzle we leverage shared memory (SRAM). Like Puzzle 7, we add a scalar to a 2D tensor, but now each block has fewer threads than there are input elements.
As shown above, SRAM is orders of magnitude faster than DRAM. Accessing global memory directly is slow, so we first load data into shared memory—then perform our computations for much faster access.
Although this input is too small to reveal a noticeable speedup, the advantage of shared memory becomes substantial as array sizes increase.
Now, because our operations depend on all records being available in shared memory, we need to wait for all threads in a block to write data to the shared memory before we can access it. Failure to do this can lead to deadlocks or undefined behaviour. Hence, we need synchronisation!
Mojo has support for all the common synchronisation primitives, similar to CUDA primitives. For this puzzle, we need to use the barrier synchronisation, which is the same as _syncThreads() in CUDA: Ensure all threads within a thread block reach the barrier before any can proceed.
Raw memory
Solution
p08.mojo
alias TPB = 4
alias SIZE = 8
alias BLOCKS_PER_GRID = (2, 1)
alias THREADS_PER_BLOCK = (TPB, 1)
alias dtype = DType.float32


fn add_10_shared(
    out: UnsafePointer[Scalar[dtype]],
    a: UnsafePointer[Scalar[dtype]],
    size: Int,
):
    shared = stack_allocation[
        TPB,
        Scalar[dtype],
        address_space = AddressSpace.SHARED,
    ]()
    global_i = block_dim.x * block_idx.x + thread_idx.x
    local_i = thread_idx.x
    # local data into shared memory
    if global_i < size:
        shared[local_i] = a[global_i]

    # wait for all threads to complete
    # works within a thread block
    barrier()

    if global_i < size:
        out[global_i] = shared[local_i] + 10.0
pixi run p08
# out: HostBuffer([11.0, 11.0, 11.0, 11.0, 11.0, 11.0, 11.0, 11.0])
# expected: HostBuffer([11.0, 11.0, 11.0, 11.0, 11.0, 11.0, 11.0, 11.0])LayoutTensor
Key difference here is to use LayoutTensorBuild instead of stack_allocation to allocate shared memory.
Solution
p08_layout_tensor.mojo
alias TPB = 4
alias SIZE = 8
alias BLOCKS_PER_GRID = (2, 1)
alias THREADS_PER_BLOCK = (TPB, 1)
alias dtype = DType.float32
alias layout = Layout.row_major(SIZE)


fn add_10_shared_layout_tensor[
    layout: Layout
](
    out: LayoutTensor[mut=True, dtype, layout],
    a: LayoutTensor[mut=True, dtype, layout],
    size: Int,
):
    # Allocate shared memory using tensor builder
    shared = tb[dtype]().row_major[TPB]().shared().alloc()

    global_i = block_dim.x * block_idx.x + thread_idx.x
    local_i = thread_idx.x

    if global_i < size:
        shared[local_i] = a[global_i]

    barrier()

    if global_i < size:
        out[global_i] = shared[local_i] + 10.0
pixi run p08_layout_tensor
# out: HostBuffer([11.0, 11.0, 11.0, 11.0, 11.0, 11.0, 11.0, 11.0])
# expected: HostBuffer([11.0, 11.0, 11.0, 11.0, 11.0, 11.0, 11.0, 11.0])Conclusion
We covered simple algorithms such as map, zip using Mojo, and did some initial work with their LayoutTensor abstraction, which similar to the CuTe library.
Stay tuned for more posts—I’ll be diving into more advanced GPU puzzles and Mojo tricks soon!
If you spot mistakes or have better/faster Mojo code, open a PR or ping me on Twitter/X. Happy hacking!